Skip to content

Hey there, fellow Mac users!
Ever wanted to create a killer tutorial, capture an epic gaming moment, or just show off your sick desktop setup?
Well, you’re in luck because I’m about to spill the beans on how to record your Mac screen like a boss in 2024. Trust me, I’ve been there – fumbling around with complicated software and ending up with potato-quality recordings.
But those days are over, my friends.
Let’s dive into the world of Mac screen recording and level up your content game!
Table of contents
- Built-in Magic: Using QuickTime Player
- Screenshot vs. Screen Recording: When to Use Each
- Keyboard Shortcuts: The Secret Sauce of Mac Screen Recording
- Third-Party Tools: Leveling Up Your Screen Recording Game
- Advanced Techniques: From Newbie to Screen Recording Ninja
- Troubleshooting: Conquering Common Mac Screen Recording Issues
- Mac Screen Recording for Different Purposes
- Conclusion
- Frequently Asked Questions
Built-in Magic: Using QuickTime Player
Alright, let’s start with the basics. Your Mac comes packing some serious heat right out of the box, and QuickTime Player is your secret weapon for screen recording. Here’s how to unleash its power:
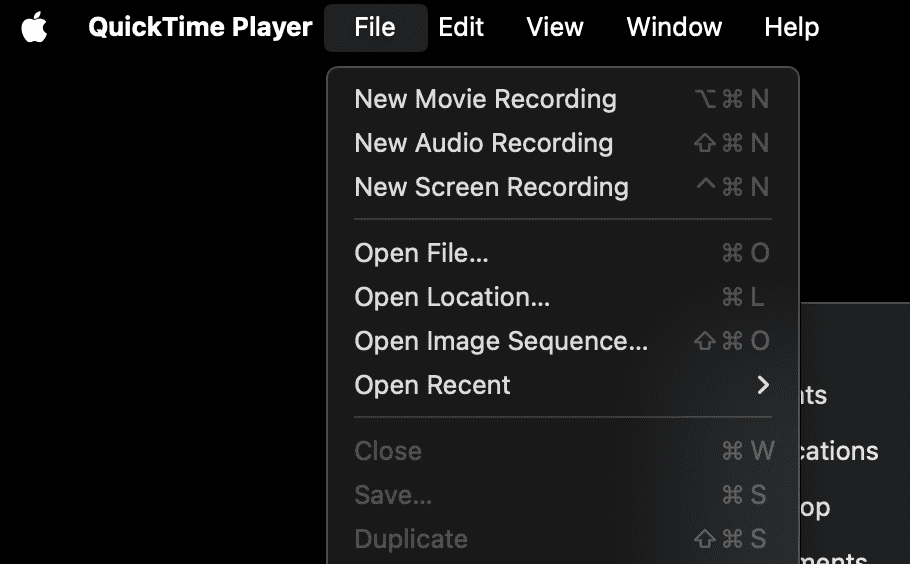
- Open QuickTime Player from your Applications folder or Spotlight search.
- Click on “File” in the menu bar, then select “New Screen Recording.”
- A small recording window will pop up. Click the arrow next to the record button to choose your audio source.
- Hit that record button and select the area you want to capture.
- When you’re done, click the stop button in the menu bar or press Command + Control + Esc.
Pro tip: Want to narrate your screen recording? Select “Internal Microphone” as your audio source before hitting record. You’ll be dropping knowledge bombs in no time!
Screenshot vs. Screen Recording: When to Use Each
Now, you might be wondering, “Sachin, when should I use a screenshot instead of a screen recording?” Great question! Here’s the lowdown:
- Screenshots are perfect for capturing static information, like error messages or specific settings.
- Screen recordings shine when you need to show a process or movement, like demonstrating how to use software or capturing gameplay.
My advice?
Master both techniques and use them strategically. Combine screenshots with annotations for quick explanations, and bust out the screen recordings when you need to walk someone through a complex process.
Keyboard Shortcuts: The Secret Sauce of Mac Screen Recording
Listen up, because this is where the magic happens. Keyboard shortcuts are like cheat codes for your Mac, and they’ll make your screen recording workflow smoother than butter on a hot pancake.
- Command + Shift + 5: Opens the screenshot and recording toolbar
- Command + Shift + 3: Captures the entire screen
- Command + Shift + 4: Lets you select an area to capture
Customize these shortcuts in System Preferences > Keyboard > Shortcuts. Trust me, your future self will thank you for this productivity boost.
Third-Party Tools: Leveling Up Your Screen Recording Game
While QuickTime Player is great for beginners, sometimes you need to bring out the big guns. Here are some third-party apps that’ll take your screen recording to the next level:
- OBS Studio: Free, open-source, and powerful. Perfect for live streaming and advanced recordings.
- ScreenFlow: A personal favorite for its robust editing features and sleek interface.
- Camtasia: The Swiss Army knife of screen recording. Pricey, but worth it for professionals.
Choose the tool that fits your needs and budget. Remember, the best app is the one you’ll actually use!
Advanced Techniques: From Newbie to Screen Recording Ninja
Ready to go from zero to hero? Try these advanced techniques to make your screen recordings pop:
- Add annotations and callouts to highlight important areas.
- Use picture-in-picture to show your webcam feed alongside your screen recording.
- Edit your recordings to cut out mistakes and add transitions.
- Compress your videos to save space without sacrificing quality.
Practice these techniques, and you’ll be churning out pro-level content faster than you can say “Subscribe and smash that like button!”
Troubleshooting: Conquering Common Mac Screen Recording Issues
Even screen recording ninjas run into problems sometimes. Here are some quick fixes for common issues:
- Audio out of sync? Try recording audio separately and syncing it in post-production.
- Mac running slow during recording? Close unnecessary apps and free up some disk space.
- Massive file sizes? Use H.264 compression when exporting your videos.
Don’t let technical hiccups stop you from creating awesome content. Troubleshoot, adapt, and overcome!
Mac Screen Recording for Different Purposes
The beauty of screen recording is its versatility. Here are some cool ways to use this skill:
- Create engaging tutorial videos for your YouTube channel or online course.
- Capture epic gameplay footage for your Twitch stream or gaming montages.
- Record important video calls or webinars for future reference.
- Archive online content before it disappears into the digital abyss.
Get creative and find your niche. The screen recording world is your oyster!
Conclusion
Alright, screen recording warriors, you’re now armed with the knowledge to capture your Mac screen like a true digital badass. Remember, practice makes perfect, so don’t be afraid to experiment and find your own recording style. Whether you’re looking to create the next viral tutorial or just want to show your grandma how to use FaceTime, you’ve got the tools to make it happen.
Ready to take your digital game to the next level? Check out our killer WordPress hosting and maintenance services at The Backend Banter. We’ll keep your site running smoother than a freshly recorded Mac screen video. Let’s make some digital magic together!
Frequently Asked Questions
Absolutely! Your Mac comes with built-in tools like QuickTime Player that allow you to record your screen at no extra cost. It’s a powerful feature that often gets overlooked, but it’s perfect for basic recording needs.
When using QuickTime Player, click on the dropdown menu next to the record button and select “Internal Microphone” to capture your voice along with the screen recording. For system audio, you’ll need a third-party app or a workaround like Soundflower.
While “best” can be subjective, some popular options include OBS Studio (free and open-source), Camtasia (feature-rich but pricey), and ScreenFlow (great for Mac users). Each has its strengths, so choose based on your specific needs and budget.
The duration of your screen recording is primarily limited by your available storage space. Theoretically, you can record as long as you have free disk space. However, for longer recordings, make sure your Mac is plugged in to avoid battery issues.
Yes! You can use the built-in iMovie app for basic edits, or more advanced software like Final Cut Pro or Adobe Premiere for professional-level editing. Many screen recording apps also come with their own editing features.
There you have it, folks – everything you need to know about recording your Mac screen in 2024.
Now get out there and start creating some awesome content!